I’m constantly amazed by how often I turn to DOS to finish a task. The more Microsoft tries to push us into a graphical world, good ‘ole command line brings us back in. Perhaps this is why so many prefer to run Linux.
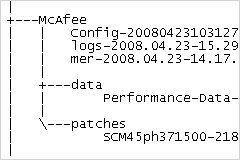
Anyway, I recently needed to generate a list of every folder and file that is in a particular directory. Windows XP doesn’t offer a way to do this and I’m not aware that Vista does either. So, to DOS I turned once again to make this list. It only required typing one little command and, when it was done, I had a nice little text file that presented my list in a fully expanded tree.
How to List Every File and Folder in a Directory with Tree
To create such a list for yourself, follow these simple instructions:
- Click Start > Run (or press Windows key + R) to open the Run dialog box.
- In the Run dialog box, type ‘cmd’ (without the quotes) and click OK. A black window with a command prompt will appear.
At the prompt, type the following:
tree "c:targetdirectory" > "c:mydirectorytree.txt" /A /F
Note: Replace ‘targetdirectory’ with the directory from which you want to make your list. Replace ‘mydirectorytree.txt’ with the directory in which you want to save the list, as well as the file name you wish to use for your text file.
- Click the Enter key.
- The prompt will move down to the next line, giving the false appearance that nothing happened. You should find your text file in the directory you indicated. Now you can archive the list, or print it out, or do anything you might do to a text file.
This might seem a little foreign if you’ve never or rarely used a DOS prompt. Just practice with a couple of directories and I think you’ll get the hang of it.
DOS Command: Tree
Let’s break this down just a bit further to make sure you understand. Here’s the example I used just a moment ago:
tree "c:targetdirectory" > "c:mydirectorytree.txt" /A /F
Starting from the left:
tree– This indicates that we are executing the tree command, which can list all folders, subfolders, and ever file in those folders. This list is in the form of a directory tree, which is used to show how the folders are organized."c:targetdirectory"– This indicates which folder you want to use as the starting point for your tree list. It can be any folder or even just a drive letter (such asc:Be careful with listing entire drives, it can take a while and can create a fairly massive text file).>(the ‘greater than’ symbol) – The ‘Greater Than’ symbol allows us to take the results of the command, which is everything to the left of the symbol, and place it into a file."c:mydirectorytree.txt"– Since we’re putting our list into a text file with the ‘Greater Than’ symbol, we have to include a place for it to be stored. You can use any drive or directory available to you, just be sure to remember where you’ve put it!/A– This is called a “switch.” You can think of a switch as an extra feature that can be turned on or off. Each command has their own set of switches and, even though the switches look the same among different commands, they most often do different things. This particular switch changes the character set that’s used to draw the “tree” (the lines that indicate a change in hierarchy). You can experiment with not using this switch by removing it from the command all together to see what you prefer./F– This switch lists all files that are within the folders and subfolders. If you wish to just see folders and not the files within them, leave this switch out.
That’s all there is to it. This can be especially handy for web developers who have just been given a new site to manage. Network Admins can use this for more sneaky reasons, such as discovering the existence of questionable files. If you can think of some other handy way to use this powerful DOS command, leave a comment!
SOURCE | LINK | LANGUAGE | ENGLISH |
