Transparent text in your PowerPoint presentation lets objects in the background (for example, pictures, SmartArt, etc) show through.
You can make text have verying degrees of transparency, from completely solid, to 50% transparent (you can see the background but you can also see the shape of the text clearly), to completely transparent (you can’t see the text at all). But you’re not limited to 100%, 50% and 0 – you can have any percentage of transparency you want between 0 and 100.
To make your text transparent, first of all select it by clicking on the border of the text box it’s in, or by dragging your cursor over it. The advantage of dragging your cursor over the text is that you can select only a portion of the text – that is, precisely the text you want to make transparent – whereas clicking on the text box selects all the text inside. Use whichever method gives you what you want.
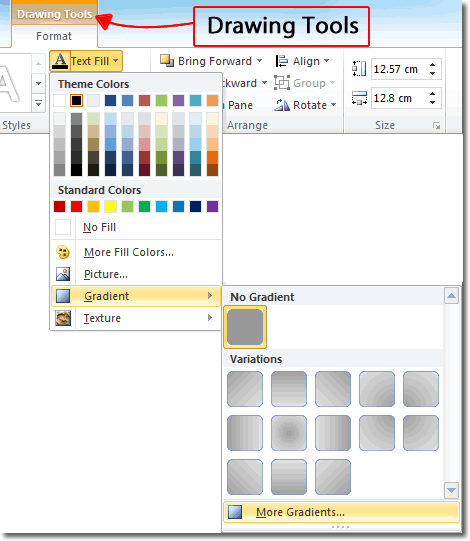
When your text is selected, you should see the Drawing Tools tab appear in the ribbon, with the Format tab within that. Go to the Format tab and click Text Fill in the WordArt Styles group. When the menu opens, click Gradient > More Gradients.
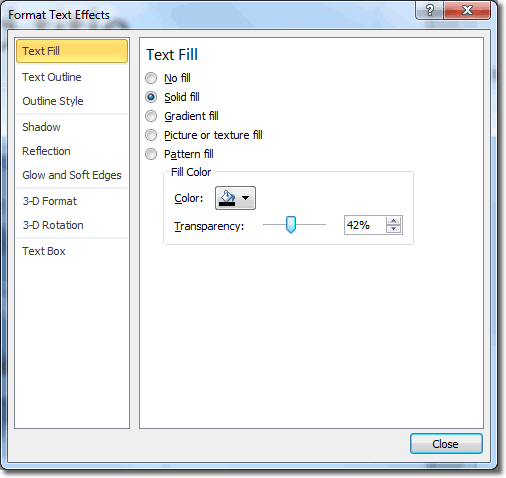
When the Format Text Effects window opens, make sure that Text Fill is selected on the left and select Solid Fill on the right. You should see a Transparency slider at the bottom of the window – drag that to the right to make your text more transparent and to the left to make it more solid.
Here is an example of some transparent text in a PowerPoint presentation:
In the example above, the text is clearly marked out by the border on it (use the Text Outline button to put a border on text). If you have this kind of a border on your text, you could actually make the Text Fill “No Fill” and you would still be able to read it. Using a semi-transparent colour for the text adds something extra, though.
SOURCE | LINK | LANGUAGE | ENGLISH |


