To totally unlock this section you need to Log-in
Login
The Enhanced Mitigation Experience Toolkit (EMET) is a free tool from Microsoft that incorporates advanced protection from attackers. The concept allows added protection from methods that hackers use to compromise systems through exploitation.
Common protection mechanisms such as Address Space Layout Randomization (ASLR), Data Execution Prevention (DEP), and Safe Structured Exception Handler (SafeSEH) are protections built inside of Microsoft’s newer operating systems. These protections provide a base level of security against known exploit methods. Hackers have gradually increased the sophistication of exploit development and have found ways of circumventing a large portion of these mitigation techniques.
EMET works by injecting an EMET.dll into running executables to provide memory level protections and mitigations against common exploit techniques. Nothing is perfect – several individuals have demonstrated how to circumvent EMET however, it does become much more difficult and has to be built into the exploit.
The folks over at Microsoft continue to move the product forward by including fixes and enhancements each time making it both more compatible with several different products as well as making it more difficult to circumvent and bypass.
For individuals new to EMET, the way it works is you first need to deploy EMET, baseline applications and create a template of what types of applications you want to cover within EMET.
The big misconception for large organizations is that by deploying EMET, it will break everything. The truth of the matter is that EMET only protects what is specified, tested, and configured within your configuration profile (xml). You actually have to specify what applications you want to protect under EMET (there are common templates that include basic applications). EMET is relatively trivial and easy to deploy.
Installing EMET
First head over to the Microsoft EMET page to download the latest version of EMET. Currently (August 2016) this is version 5.5. Download EMET here.
Next, select download and then select the .msi setup installer (and the guide, if you want to know more on EMET).
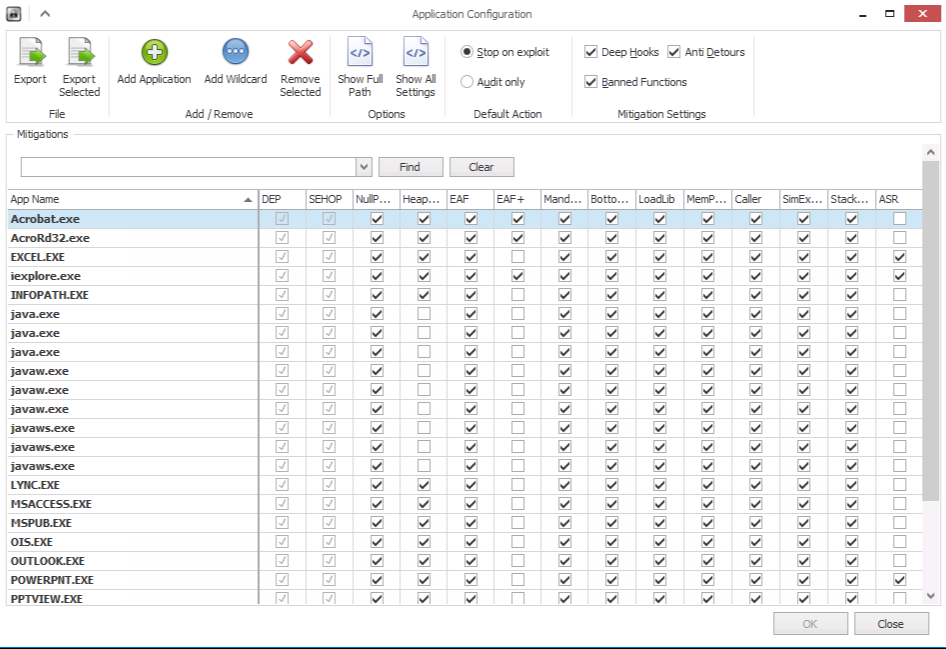
On the top left section, ensure that “Deep Hooks”, “Anti Detours”, and “Banned Functions” are selected. These should all be highlighted as these are default configurations of EMET 5.x. Also ensure “Stop on exploit” is selected. The only time when you may want to deploy “Audit only” is when you are doing initial testing and are experiencing application crashes. EMET will notify you upon a time when it would traditionally block something from running vs. actually stopping it from running and you can fine tune EMET’s protections to not block a certain protection for normal application functionality.
Install EMET silently
The EMET installer is an MSI, so installing via your favorite systems management suite (like System Center Configuration Manager) is fairly easy. Just use the following command line:
msiexec.exe /i “EMET Setup.msi” /qn /norestart
Please note that using this method installs EMET with very minimal configuration; it will still be necessary to configure EMET after installing it.
Custom Configurations for EMET
For enterprise users, and tech savvy folks, you will want to incorporate additional applications for added protection. This is highly recommended and a necessity for enterprise deployments.
In the same window as the prior steps, if you look at the lower bottom section, this is the current list of all of the protected applications currently under EMET. Since we haven’t made any changes, you can see these are the default applications protected under EMET with the security profile selected. This would include Java, Internet Explorer, Adobe, Office products, and more. If creating a template for your organization as a standard configuration for enterprises, We recommends creating two separate templates, one for servers and another for workstations/endpoints.
To add a new application, you can simply select “Add Application” and point EMET to an executable you want protected. The way you could break up protection mechanisms is as follow:
1. Client Side Attacks – applications that can be used against a workstation or server that can be leveraged for remote code execution. These are typically third party applications that are installed that accept some form of input, whether its a file or commands. For example, Foxit Software a PDF reader commonly used as a replacement for Adobe. You would point EMET to the Foxit executable and it would be successfully added. If you test this out, you should notice that when you launch an application added here, it will show up under the “Running EMET” section as green (only when the application is running).
2. Server / Service Attacks – these are categorized as services, ports, and protocols that could be subjective to attack. Here’s where it gets a little bit on the cautious side. Microsoft’s stance has been to protect mostly client-side attacks from exploitation. However, common services are also frequently attacked. EMET can be deployed on services in order to add additional protection. A common deployment scenario that we typically see is placing EMET over IIS, SMTP (transport), RDP, SMB, RPC, and other commonly attacked services. Please note that this isn’t a recommended practice from Microsoft however through our experience, we haven’t seen any compatibility issues by placing EMET on these services. Think like an attacker when deploying EMET – we will commonly go after endpoints, and exposed services. Having EMET deployed on these services greatly reduces the ability for zero-day attack angles as well as a temporary mitigation against missing patches. This can be deployed both on workstations/endpoints and servers.
Once you’ve determined what applications to add, there’s another section that makes it super simple to configure common services that are already running.
Exit out of the apps menu and go back to the original EMET home screen. Under the section “Running Processes” is a list of all processes running on your current system. Skim through the processes and identify what services you want to protect, for example below, we’ll cover the IIS (inetinfo) service (executable) under EMET.
Simply right click the executable process, and select “Configure Process”. This will automatically add EMET to the applications list for protection.
Now that this process is now configured, if we do an iisreset from the command line:
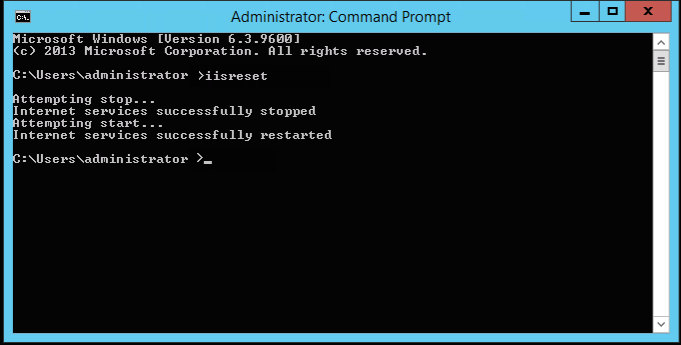
We should now see the application fully protected under “Running EMET” on the right hand side, indicated by a green check mark.
![]()
That’s it! You are now protected. Walk through each of the processes and applications that you want protected to create your baseline.
Enterprise Deployment Strategies
For enterprise users, there are two main deployment methods that work successfully for both small and large organizations. The first is handling configuration changes through your patch management software such as SCCM. You can make the changes to the template, and push the xml to each system through SCCM when changes are needed for compatibility or enhancements. Remember from prior steps, you want to keep two separate configurations, one for servers and others for workstations/endpoints (makes things easier when having to deploy and keep track of changes). You can also manage EMET through group policy however the group policy settings are limited in nature and do not have the same granularity as utilizing the xml deployment methods.
A good article on group policy deployment can be found here http://windowsitpro.com/security/control-emet-group-policy. One major catch is also creating a scheduled task to perform a EMET_Conf -refresh upon logon to ensure the latest policies are pushed when a new user logs into their machine.
The second method, which is most preferred is by automatically refreshing EMET policies via a scheduled task and a remote file share. In this case, you would configure EMET completely, test it with a pristine XML then export it. You can do this either through the GUI or when inside the EMET directory, you can just run:
EMET_Conf.exe –export EMET_Endpoint_Profile.xml
The template will now be exported appropriately. Next create a GPO and name it something like “EMET Config Deployment for Endpoints”. You should also create a second one for server configurations and follow the same steps for exporting the profile and xml for your server configurations.
Select properties on the new GPO and grab the Unique GUID and document the number (looks something like {343423423-32423432-324324-324-32432}).
Next, go to the sysvol share on a domain controller and navigate to sysvol\domain\Policies\{new-gpo-guid}.
Place the EMET_Endpoint_Profile.xml file under that new group policy object.
Now that we have our profile here, whenever we need to make changes replace the xml file located in this location (either for endpoint or server or both). Note that the name must remain the same since we will be creating a scheduled task shortly that calls the specific file.
Since this is a sysvol share, anyone that is apart of the domain users group will have access to this group policy object and file in order to import it eventually into EMET.
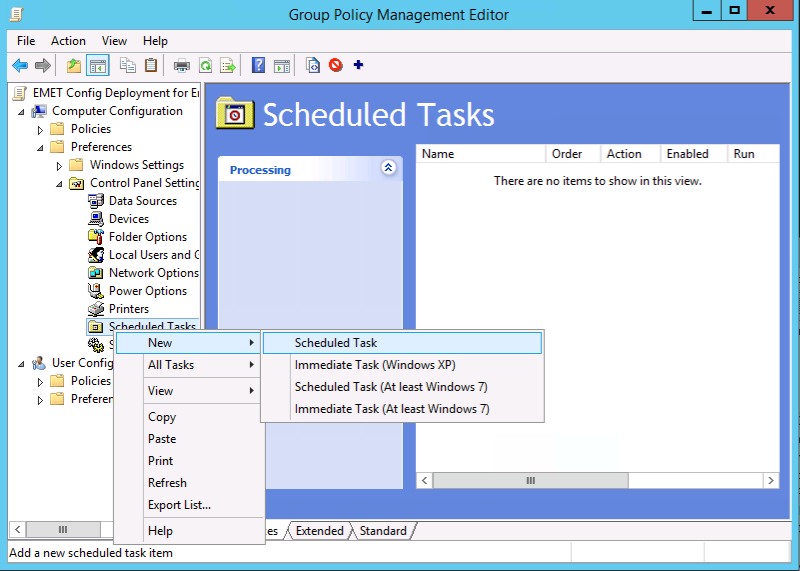
Next we need to create a group policy that runs a scheduled task. There’s a few different options you have, the first is by creating a scheduled task upon logon (the most common deployment) or the other option is having it run at certain intervals (say every hour). Under the new group policy you created (in our example "Config Deployment for Endpoints” navigate to the computer configuration, preferences, control panel settings, scheduled tasks. Select “New Scheduled Task”.
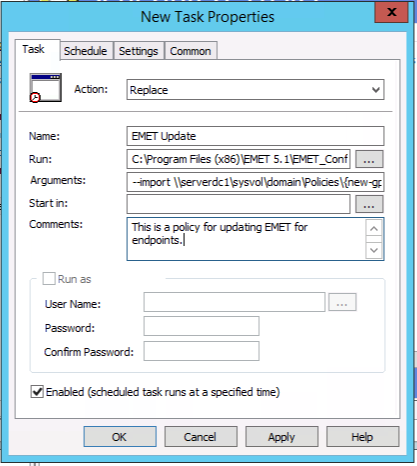
Next, select a name, in this case we use “EMET Update”, navigate to the EMET 5.1 program files directory and select the “EMET_Conf.exe” executable. For arguments use the –import flag with EMET which will import the xml file for us and select our domain controller to pull the group policy from. In this case we use the example of “serverdc1” and provide the path to our new policy we created in group policy and point to our xml that we recently copied over “EMET_Endpoint_Profile.xml”.
We can also specify when to run this xml, upon logon, daily, hourly, weekly, whatever your personal preferences are.
You should now have a scheduled task and whenever you replace the xml file located in that group policy, it will automatically refresh to your user population without the need to deploy additional packages company wide through something like SCCM.
EMET and Group Policies
The EMET.admx and EMET.adml administrative template files are automatically installed to the <SystemDrive>\Program Files\EMET\Deployment\Group Policy Files.
To effectively leverage these files from your GPOs, you must copy the .admx file to the <SystemDrive>\Windows\PolicyDefinitions file system folder and the .adml file to the <SystemDrive>\Windows\PolicyDefinitions\en-US folder on a Active Directory Domain Controller.
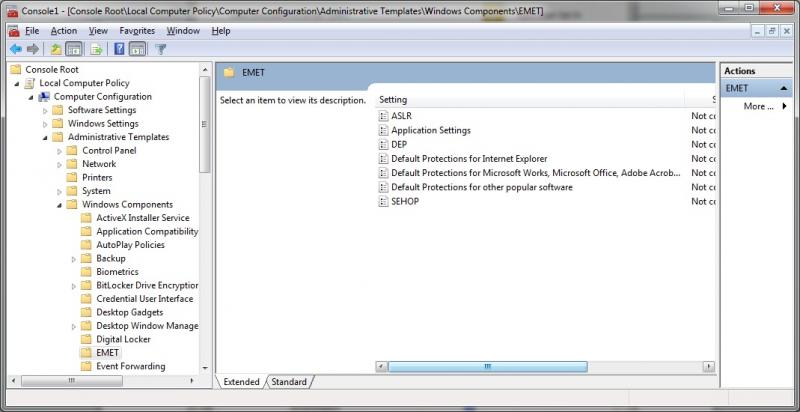
After moving the files, you can centrally configure system-wide and application-specific EMET attack mitigation settings from the \Computer Configuration\Administrative Template\Windows Components\EMET GPO container, as the following figure shows:
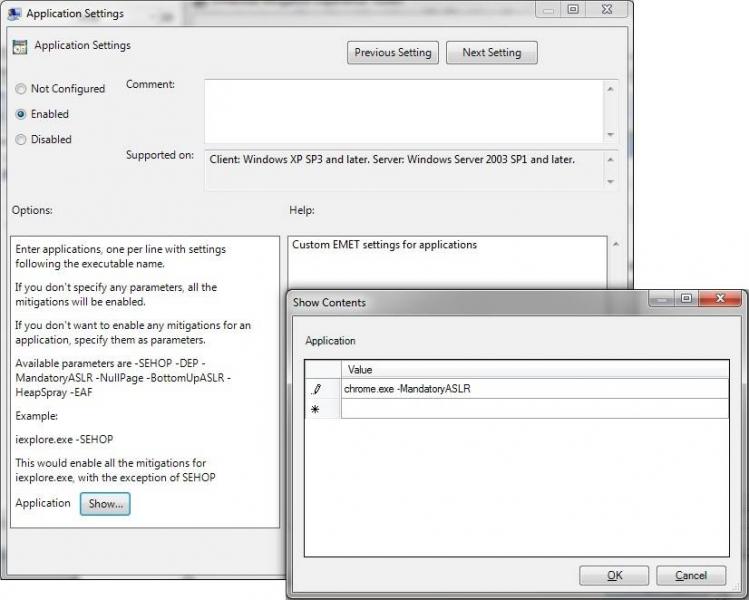
For example, to exempt the Google Chrome application from ASLR on all machines in your domain that have EMET installed, you can use the Application Settings GPO setting, as the below figure shows.
To configure this option, open the setting, set it to Enabled, then click the Show button at the bottom. Finally, enter "chrome.exe -MandatoryASLR" in the Show Contents screen to add the domain-wide ASLR opt out exception for chrome.exe.
After you've centrally configured EMET GPO settings, the GPO client-side engine writes them to the local system registry at HKEY_LOCAL_MACHINE\SOFTWARE\Policies\Microsoft\EMET. But this step alone isn't sufficient to apply the EMET settings automatically on the level of the EMET client-side logic.
To make them effective in EMET, you must run the following EMET_Conf.exe command during system startup or user logon:
EMET_Conf -refresh
Also keep in mind that the EMET settings you configure through Group Policy take precedence over the settings an administrator or user configures locally by using the EMET GUI or command-line tools.
Recommended applications to add
With EMET you can specify either the full path name to the application, or Windows environment variables or wildcards such as * and ? (the latter is new to EMET). The only restriction is that the wildcard needs to be in the path, not in the filename, so entries such as "*fox.exe" or "C:\Program Files\Mozilla Firefox\*.exe" would not be valid. For example you could specify any of the following to protect firefox.exe:
EMET_conf.exe --set "C:\Program Files\Mozilla Firefox\firefox.exe"
EMET_conf.exe --set "*\Mozilla Firefox\firefox.exe"
EMET_conf.exe --set "*\firefox.exe"
EMET_conf.exe --set "%ProgramFiles%\Mozilla Firefox\firefox.exe"
EMET_conf.exe --set "%ProgramFiles%\*\firefox.exe"
In addition, the application does not already need to be installed in order for EMET to accept the parameter (with previous versions of EMET you had to specify the parameter --force to do this). So in an enterprise environment you could define entries for applications that are not currently installed on a system but could be at a future point in time. So when you deploy EMET you could push it out with a large list of applications ahead of time so that you don't need to reconfigure EMET every time you install new software.
Also consider using wildcards such as "*\Mozilla Firefox\firefox.exe" instead of "C:\Program Files (x86)\Mozilla Firefox\firefox.exe" if you wish to reduce the duplication of entries or configurations to accommodate mixed 32/64-bit environments.
 |  |