Did you know that it’s possible to power on a virtual machine and even determine the dynamic IP address of a guest OS using a simple command-line utility? This could be handy after a disaster or if you normally rely on a Windows virtual machine to run the vSphere Client and don’t want to run a VM for a quick task.
Power on and SSH to a Linux VM
Consider this real-world situation: you are working remotely on your Mac and need to log into a powered-off Linux VM back in the data center.
Don’t fret: if you can ssh to the host using Tech Support Mode (old VMware ESXi 4.1 shown here), you are most of the way there. Thanks to vim-cmd you can find your VM, power it on, and learn the guest OS IP address in no time:
Let’s break it down step by step:
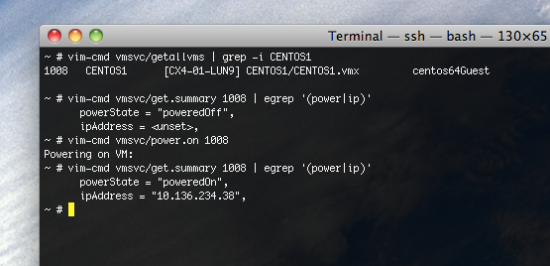
Use grep to find the ID of your VM (the Vmid 1008 in this example):
~ # vim-cmd vmsvc/getallvms | grep -i CENTOS1
1008   CENTOS1      [CX4-01-LUN9] CENTOS1/CENTOS1.vmx         centos64Guest
Quick sanity check to verify the VM is actually powered off:
~ # vim-cmd vmsvc/get.summary 1008 | egrep '(power|ip)'
      powerState = "poweredOff",
      ipAddress = ,
Power on, wait a few moments, and check status again:
~ # vim-cmd vmsvc/power.on 1008
Powering on VM:
~ # vim-cmd vmsvc/get.summary 1008 | egrep '(power|ip)'
      powerState = "poweredOn",
      ipAddress = "10.136.234.38",
~ #
Connect with ssh (or RDP, if targeting a Windows VM) and get on with things.
Enabling and Accessing Tech Support Mode
To enable local or remote TSM from the Direct Console User Interface (DCUI):
- At the DCUI of the ESXi host, press F2 and provide credentials when prompted. Press F2 again to proceed.
- Scroll to Troubleshooting Options and press Enter. This opens the Troubleshooting Mode Options wizard.
- To enable local TSM allowing users to log into the virtual console of the ESXi host.
- In ESXi 5.x and 6.x, select Enable ESXi Shell and press Enter. The right-hand panel mode should now indicate ESXi Shell is Enabled.
- In ESXi 4.1, select Local Tech Support and press Enter. The right-hand panel mode should now indicate the Local TSM is Enabled.
To enable remote TSM allowing users to log in via SSH on the virtual console of the ESXi host:
- In ESXi 5.x and 6.x, select Enable SSH and press Enter.The right-hand panel mode should now indicate that the SSH is Enabled.
- In ESXi 4.1, select Remote Tech Support (SSH) and press Enter. The right-hand panel mode should now indicate the Remote TSM (SSH) is Enabled.
Optionally, if you want to configure the timeout for TSM:
- In ESXi 5.x and 6.x, select Modify ESXi Shell timeout and press Enter. Input the desired timeout value in minutes and press Enter.
- In ESXi 4.1, select Modify Tech Support timeout and press Enter. Input the desired timeout value in minutes and press Enter.
- Press Esc three times to return to the main DCUI screen.
To enable local or remote TSM from the vSphere Client:
- Select the host and click the Configuration tab.
- Click Security Profile > Properties.
In ESXi 5.x and 6.x, select SSH or ESXi Shell and click Options while in ESXi 4.1, select Local Tech Support or Remote Tech Support (SSH) and click Options.
Choose the desired startup policy and click Start, then click OK. Verify that the daemon selected in previous step shows as running in the Services Properties window.
To enable/disable and start/stop the local ESXi Shell or local TSM from the local command line on the ESXi host:
To start the ESXi Shell or local TSM, run these command:
- ESXi 5.x and 6.x: vim-cmd hostsvc/start_esx_shell
- ESXi 4.1: vim-cmd hostsvc/start_local_tsm
To disable the ESXi Shell or local TSM, run these command:
- ESXi 5.x and 6.x: vim-cmd hostsvc/disable_esx_shell
- ESXi 4.1: vim-cmd hostsvc/disable_local_tsm
To stop the ESXi Shell or local TSM, run the command:
- ESXi 5.x and 6.x: vim-cmd hostsvc/stop_esx_shell
- ESXi 4.1: vim-cmd hostsvc/stop_local_tsm
Note: These are not persistent changes. After restarting the services or rebooting the ESXi host, the changes will be lost.
To enable/disable and start/stop SSH or remote TSM from the local command line:
To enable SSH or remote TSM, run the command:
- ESXi 5.x and 6.x: vim-cmd hostsvc/enable_ssh
- ESXi 4.1: vim-cmd hostsvc/enable_remote_tsm
To start SSH or remote TSM, run the command:
- ESXi 5.x and 6.x: vim-cmd hostsvc/start_ssh
- ESXi 4.1: vim-cmd hostsvc/start_remote_tsm
To disable SSH or remote TSM, run the command:
- ESXi 5.x and 6.x: vim-cmd hostsvc/disable_ssh
- ESXi 4.1: vim-cmd hostsvc/disable_remote_tsm
To stop SSH or remote TSM, run the command:
- ESXi 5.x and 6.x: vim-cmd hostsvc/stop_ssh
- ESXi 4.1: vim-cmd hostsvc/stop_remote_tsm
Note: These are not persistent changes. After restarting the services or rebooting the ESXi host, the changes will be lost.
To configure the TSM timeout value from the vSphere Client:
- Select the host and click the Configuration tab.
- Click Software > Advanced Settings.
- ESXi 5.x and 6.x: Change the UserVars.ESXiShellTimeOut field to the desired value.
- ESXi 4.1: Change the UserVars.TSMTimeOut field to the desired value.
Click OK.
To access the local TSM:
- At the main DCUI screen, press ALT+F1 simultaneously. This opens a virtual console window to the host.
- Provide credentials when prompted.
Note: When typing the password, characters are not displayed on the console.
To access the remote TSM:
- Open an SSH client (like PuTTY).
- Specify the IP address or domain name of the ESX host.
- Provide credentials when prompted.
Notes: by default, SSH works on TCP port 22.
 |  |