To totally unlock this section you need to Log-in
Login
In this article, we will learn how to backup and restore the VMware ESXi 6.x configuration using the ESXi command line. It goes without saying how important it is to have a backup and the configuration of an ESXi host is no exception. It can be time consuming to configure the network settings and should your hosts USB stick or operating system drive fail, a backup will save you time.
First of all, since this tutorial will be using the ESXi command line, you will need to connect to the host using SSH. Once you have connected to the host via SSH, run the following command to backup the configuration:
vim-cmd hostsvc/firmware/backup_config
The following image shows the output of the command:
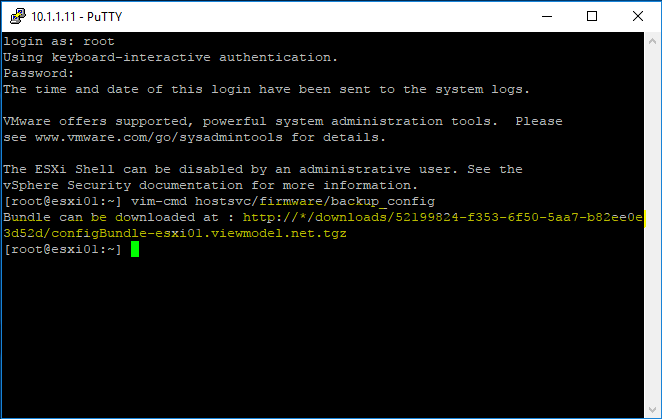
The backup will be saved in /scratch/downloads folder.
Obviously storing the backup on the same device is not ideal so we need to transfer the archive off the host. You can do that by entering the URL of the backup commands output into a web browser. As you can see in the image above the URL does not contain the IP address of the host. You will need to replace the * with the host IP address.
Alternatively you can use WinSCP or some other utility to transfer the archive using SSH.
Restoring the ESXi Configuration
In order to restore the backup of the ESXi configuration, you need to install the same version and build number of ESXi on your hardware. Once installed, you need to configure the management network so that you can connect to the device using SSH.
Once connected you will need to transfer the backup archive to /tmp/configBundle.tgz on the host using a transfer utility.
With the file transfered, all that’s left to do is run the following commands:
vim-cmd hostsvc/maintenance_mode_enter
vim-cmd hostsvc/firmware/restore_config /tmp/configBundle.tgz
The host will reboot with the old configuration applied. You can now exit maintenance mode and use the host.
Conclusion
In this post we covered how to backup and restore the configuration of an ESXi 6.x host using the ESXi Command line. It’s worth mentioning again that in order to restore a backup the build of the host must match the build contained in the original backup. This means you should take a backup each time you upgrade the host.
Other way to do a Backup of ESXi Hosts
Using the vSphere CLI
To back up the configuration data for an ESXi host using the vSphere CLI, run this command:
vicfg-cfgbackup --server=ESXi_host_IP_address --username=root -s output_file_name
If you are using vSphere CLI for Windows, run this command:
vicfg-cfgbackup.pl --server=ESXi_host_IP_address --username=root -s output_file_name
Where ESXi_host_IP_address is the IP address of the ESXi host and output_file_name is the name of the backup file you create.
NOTE: From vSphere CLI for Windows, ensure you are executing the command from C:\Program Files\VMware\VMware vSphere CLI\bin.
vSphere CLI:
vicfg-cfgbackup --server=10.0.0.1 --username=root -s ESXi_test1_backup.tgz
vSphere CLI for Windows:
vicfg-cfgbackup.pl --server=10.0.0.1 --username=root -s ESXi_test1_backup.tgz
NOTE: Use the --password=root_password option (where root_password is the root password for the host) to avoid being prompted for the root user password when you run the script.
A backup text file is saved in the current working directory where you run the vicfg-cfgbackup script. You can also specify a full output path for the file.
Using the vSphere PowerCLI
To back up the configuration data for an ESXi host using the vSphere PowerCLI, run this command:
Get-VMHostFirmware -VMHost ESXi_host_IP_address -BackupConfiguration -DestinationPath output_directory
Where ESXi_host_IP_address is the IP address of the ESXi host and output_directory is the name of the directory where the output file will be created.
For example:
Get-VMHostFirmware -VMHost 10.0.0.1 -BackupConfiguration -DestinationPath C:\Downloads
NOTE: A backup file is saved in the directory specified with the -DestinationPath option.
Other way to do a Restore of ESXi Hosts
Restoring the host configuration restores the state of the ESXi along with the vSphere standard switch networking configuration.
Using the vSphere CLI
NOTE: When restoring configuration data, the build number of the host must match the build number of the host on backup file and UUID (can be obtained using the command "esxcfg-info -u") of the host should match the UUID of the host on backup file. Use the -f option (force) to override the UUID mismatch.
To restore the configuration data for an ESXi host using the vSphere CLI:
- Power off all virtual machines that are running on the host that you want to restore.
- Log in to a server where the vCLI is installed.
- Run the vicfg-cfgbackup script with the -l flag to load the host configuration from the specified backup file:
vicfg-cfgbackup --server=ESXi_host_IP_address --username=root -l backup_file
vSphere CLI for Windows:
vicfg-cfgbackup.pl --server=ESXi_host_IP_address --username=root -l backup_file
Where ESXi_host_IP_address is the IP address of the ESXi host and backup_file is the name of the backup file to use for the restore.
For example:
vicfg-cfgbackup --server=10.0.0.1 --username=root -l ESXi_test1_backup.txt
vSphere CLI for Windows:
vicfg-cfgbackup.pl --server=10.0.0.1 --username=root -l ESXi_test1_backup.txt
NOTE: When you run this command, you are prompted for confirmation before proceeding. You can override this safety feature using the -q option. Use the --password=root_password option (where root_password is the root password for the host) to avoid being prompted for the root user password when you run the script.
To restore an ESXi host to the stock configuration settings, run the command:
vicfg-cfgbackup --server=ESXi_host_IP_address --username=root -r
For example:
vicfg-cfgbackup --server=10.0.0.1 --username=root -r
Using the vSphere PowerCLI
NOTE: When restoring configuration data, the build number of the host must match the build number of the host on backup file and UUID (can be obtained using the command "esxcfg-info -u") of the host should match the UUID of the host on backup file. Use the -force option to override the UUID mismatch.
Put the host into maintenance mode by running the command:
| Set-VMHost -VMHost ESXi_host_IP_address -State 'Maintenance' |
Where ESXi_host_IP_address is the IP address of the ESXi host.
Restore the configuration from the backup bundle by running the command:
Set-VMHostFirmware -VMHost ESXi_host_IP_address -Restore -SourcePath backup_file -HostUser username -HostPassword password
Where ESXi_host_IP_address is the IP address of the ESXi host, backup_file is the name of the backup bundle to use for the restore, and username and password are the credentials to use when authenticating with the host.
For example:
Set-VMHostFirmware -VMHost 10.0.0.1 -Restore -SourcePath c:\bundleToRestore.tgz -HostUser root -HostPassword exampleRootPassword
 |  |