To totally unlock this section you need to Log-in
Login
To change the provisioning of a virtual machine base disk from thin to thick from the Datastore Browser:
- Power off the virtual machine.
- In vSphere Client, right-click the virtual machine in the inventory.
- Click Edit Settings to display the Virtual Machine Properties dialog box.
- Click the Hardware tab and select the appropriate hard disk in the Hardware list.
NOTE: the Disk Provisioning Type section on the right displays either Thin Provision or Thick Provision. If the disk provision type is Thick, disk provisioning has already taken place. In this case, the disk provisioning is Thin.
- Click Cancel to exit from Virtual Machine Properties dialog box.
- Click the Summary tab of the virtual machine.
- Under Resources, right-click the datastore where the virtual machine resides and click Browse Datastore.
- Double-click the virtual machine folder to display the .vmdk file.
- Right-click the .vmdk file, and click Inflate. The Inflate option converts the disk to thick provisioned.
- Reload the .vmx file.
NOTE: if the Inflate option is grayed out, it indicates that the virtual machine is not powered off or that it is not thin provisioned. There should be no snapshots and the conversion is performed on the base disk.
From Thick to Thin
To convert a virtual machine base disk from thick to thin provisioning by changing the datastore and performing storage vMotion:
NOTE: This process requires more than one datastore and enough space available. If only a single datastore exists, you can clone the virtual machine to a destination machine with thin provisioned disks instead of migrating.
- Right-click the virtual machine, and click Migrate.
- Click Change datastore.
- Click Next, and select a datastore that is not the same as the current datastore.
- From the dropdown, select the Thin Provision virtual disk format.
- Click Next, then Finish. You can monitor the progress of the conversion in the Tasks and Events view in vCenter Server.
To do Storage vMotion from vSphere Webclient for vSphere 5.5, perform these steps:
- Right-click the virtual machine and select Migrate
- To locate a virtual machine, select a data center, folder, cluster, resource pool, host, or vApp.
- Click the Related Objects tab and click Virtual Machines.
- Select Change datastore and click Next.
- Select Thin Provision for the virtual machine's disks and click Next.
- Select a virtual machine storage policy from the VM Storage Policy dropdown menu and click Next.
- Select the datastore location where you want to store the virtual machine files and click Next.
- Review the information on the Review Selections page and click Finish.
.
Let's see more in detail how to follow this procedure; using Storage vMotion feature of a VMware vSphere, you can relocate any virtual machine with disk to different VMFS storage (different LUN) without interruption of services and applications. During migration of VM disks between storages, you can also change the type of the disk.
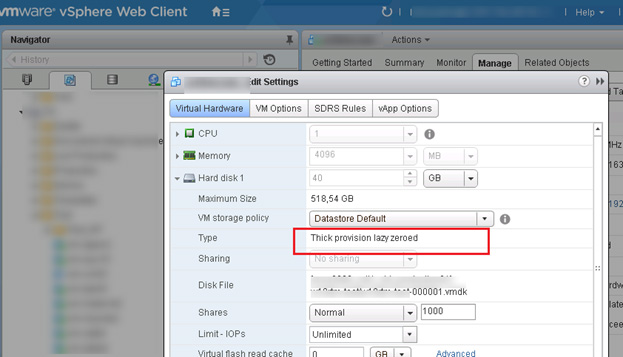
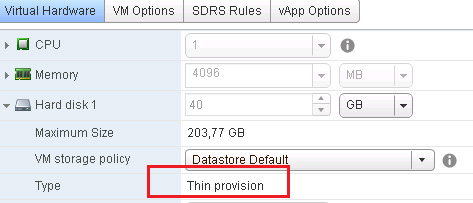
To get the current disk provisioning type for the specific VM, you have to open it’s settings and check the value of the disk type field. In our case the type of virtual disk is Thick provision lazy zeroed.
o change the disk type, you should move VM files to another datastore. If you have only one VMFS datastore, you can create temporary additional storage on any Windows server and connect it to the ESXi server via NFS.
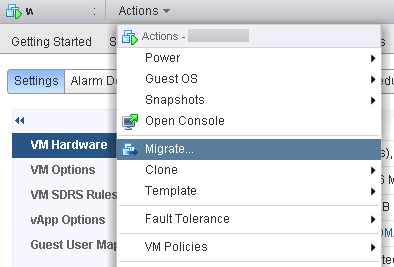
Open Virtual Machine action menu and select Migrate.
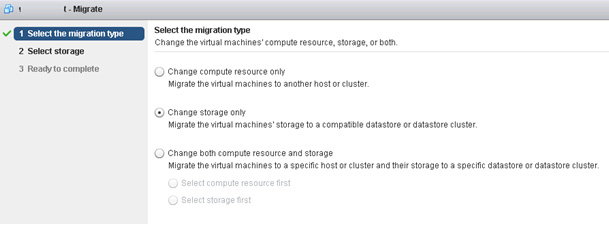
Select the migration type Change storage only.
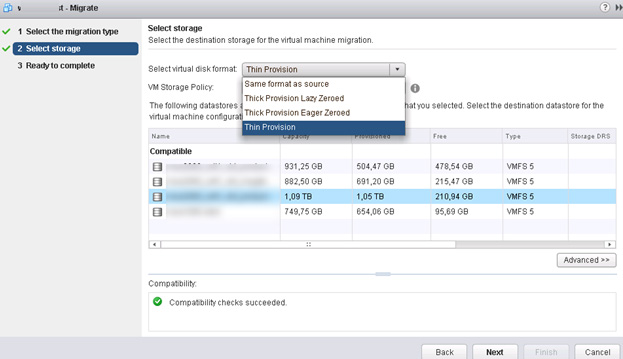
Select Thin Provision as a virtual machine disk format and choose one of the available VMFS/NFS storage on which you want to migrate the VM. Click Next.
Wait until the virtual machine files will be moved to the new storage.

Now make sure that the type of the disc is changed to Thin provision.
Change disk provisioning type using ESXI CLI
The method of changing disk provisioning type using CLI involves copying current vmdk file to a new thin provisioned disk and removing old thick disk.
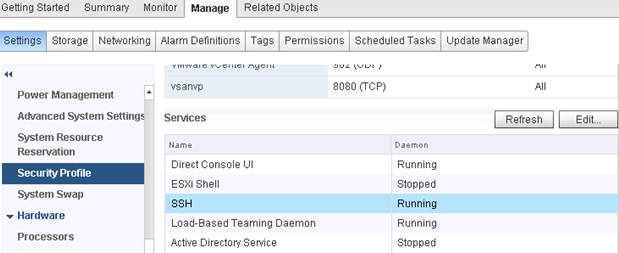
At first, you should power off your VM. To connect to the ESXi host CLI over SSH, you have to enable SSH service in the ESXi settings and allow incoming connection on TCP/22 port (Manage > Settings > Security Profile).
Connect to ESXi server as root using favorite SSH client (for example, Putty) and change directory to the vmfs/volumes:
cd vmfs/volumes
List the available datastores:
ls –lh
And go to the folder, containing your VM files.
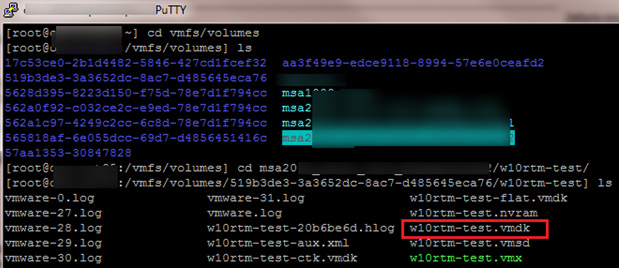
List the files containing in the directory:
ls
We are interested in the file w10rtm-test.vmdk. To convert this file from Thick to Thin, run the following command:
vmkfstools -i w10rtm-test.vmdk -d thin w10rtm-test-thin.vmdk

After the convertation is completed, delete the original Thick disk file w10rtm-test.vmdk:
rm w10rtm-test.vmdk
And rename the resulting Thin disk:
mv w10rtm-test-thin.vmdk w10rtm-test.vmdk
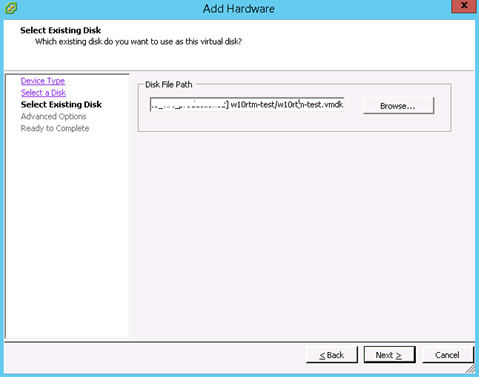
Now using vSphere Client or vSphere Web client open the VM settings and delete old disk (Select Remove from virtual machine). After that add new disk : Add > Hard Disk > Use an existing virtual disk -> select file w10rtm-test.vmdk on your datastore > Next > Finish.
Now, you can power on your VM.
 |  |
In you find yourself stuck on VMware ESX because you see that you have configured a VM with thick or thin vHDD (VMDK) you can rely on some procedures to re-convert them gaining (thin provisioning) or allocating HDD space on your datastore. Let’s see how. #howto #heelpbook #vmware #vmdk
http://heelpbook.altervista.org/2018/changing-thick-or-thin-provisioning-for-vmdk-vmware-hdd/#content