WMI comes installed on all of Microsoft's modern operating systems (Windows 2000, Windows XP, Windows 2003, Windows Vista, Windows Server 2003/2008/2012/2016, Windows 8/8.1 and Windows 10). What this page will describe is how to enable remote access to WMI. The following steps should only take a minute or two of your time.
Step 1 - Enable remote WMI requests
This setting is usually all that needs to be changed to get WMI working (Steps 2 and 3 are typically not needed, but they might be in some circumstances).
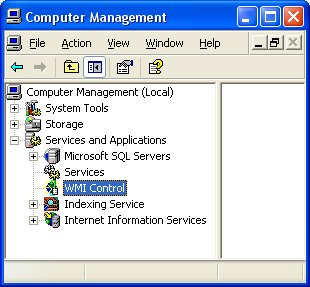
- On the target server, go to Administrative Tools -> Computer Management.
- Expand Services and Applications.
- Right click for Properties on WMI Control.
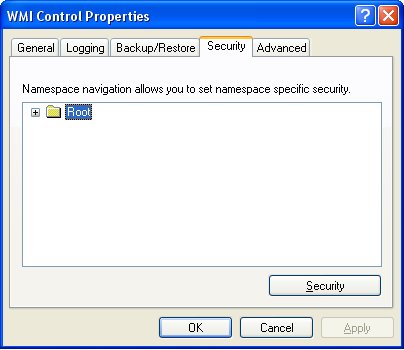
Select the Security tab and then press the Security button:
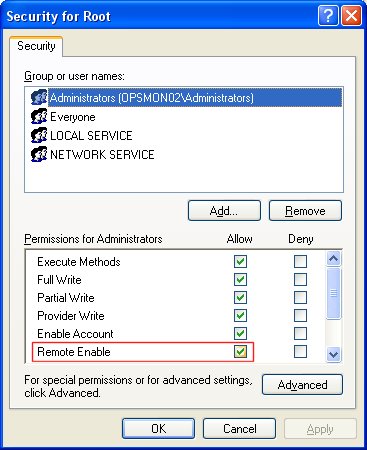
Add the monitoring user (if needed), and then be sure to check Remote Enable for the user/group that will be requesting WMI data.
At this point go back and see if this fixes the problem. It might take a couple of minutes for the reports to re-generate.
Step 2 - Allow WMI through Windows firewall
All users (including non-administrators) are able to query/read WMI data on the local computer.
For reading WMI data on a remote server, a connection needs to be made from your management computer (where our monitoring software is installed) to the server that you're monitoring (the target server). If the target server is running Windows Firewall (aka Internet Connection Firewall) like what is shipped with Windows XP and Windows 2003 (and above), then you need to tell it to let remote WMI requests through. This can only be done at the command prompt. Run the following on the target computer if it is running a Windows firewall:
netsh firewall set service RemoteAdmin enable
Step 3 - Enable DCOM calls on the remote machine
If the account you are using to monitor the target server is NOT an administrator on the target server, you need to enable the non-administrator to interact with DCOM by following the simple steps listed below. Follow the steps for:
- To grant DCOM remote launch and activation permissions for a user or group.
- To grant DCOM remote access permissions.
To grant DCOM remote launch and activation permissions for a user or group:
- Click Start, click Run, type DCOMCNFG, and then click OK.
- In the Component Services dialog box, expand Component Services, expand Computers, and then right-click My Computer and click Properties.
- In the My Computer Properties dialog box, click the COM Security tab.
- Under Launch and Activation Permissions, click Edit Limits.
In the Launch Permission dialog box, follow these steps if your name or your group does not appear in the Groups or user names list:
- In the Launch Permission dialog box, click Add.
- In the Select Users, Computers, or Groups dialog box, add your name and the group in the Enter the object names to select box, and then click OK.
- In the Launch Permission dialog box, select your user and group in the Group or user names box. In the Allow column under Permissions for User, select Remote Launch and select Remote Activation, and then click OK.
The following procedure describes how to grant DCOM remote access permissions for certain users and groups. If Computer A is connecting remotely to Computer B, you can set these permissions on Computer B to allow a user or group that is not part of the Administrators group on Computer B to connect to Computer B.
To grant DCOM remote access permissions:
Click Start, click Run, type DCOMCNFG, and then click OK.
In the Component Services dialog box, expand Component Services, expand Computers, and then right-click My Computer and click Properties.
In the My Computer Properties dialog box, click the COM Security tab.
Under Access Permissions, click Edit Limits.
In the Access Permission dialog box, select ANONYMOUS LOGON name in the Group or user names box. In the Allow column under Permissions for User, select Remote Access, and then click OK.
 |  |