To totally unlock this section you need to Log-in
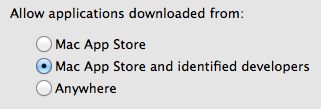
Gatekeeper is a security measure, introduced in OS X Mountain Lion, that allows the system to prevent the execution of code that does not meet certain criteria, such as possessing a valid digital signature from Apple's developer community. When setting up GateKeeper in the Security system preferences, you can set it so that only approved applications from the Mac App Store are allowed to run, additionally allow programs from approved developers to run, or you can set no restrictions and allow everything to run.
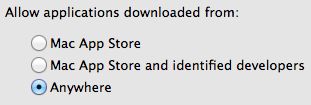
NOTE: The “Allow applications downloaded from anywhere” option is hidden by default in Gatekeeper for macOS from Sierra onward. You can see this by going to the Security & Privacy preference panel, and under the “General” section you will not find such an option for Gatekeeper app allow settings.
Typically if you want to have an application launch approved by the GateKeeper feature on a MacOS, you right-click on the unidentified developers application and choose “Open”, or go through System Preferences to bypass Gatekeeper that way.
Another option is to manually add application approvals and exceptions to Gatekeeper by turning to the command line in Mac OS X, and for this we will use the included spctl command.
Add an Application Exception
To add an application to Gatekeeper exceptions and approved application launch list, use the –add flag with spctl to approve an application launch. The following syntax style is appropriate:
spctl ——add /Path/To/Application.app
For example, to add approval for the imaginary application called “GooseRoute” that resides in the users downloads folder, the syntax string would look like the following:
spctl ——add ~/Downloads/GooseRoute.app
You will need to enter an administrator password to approve the application with Gatekeeper, otherwise you can prefix the command with sudo if you’re performing this from SSH or want to automate the process.
Another way adding a program (specified by the program path) is using a label, in this case called "MyLabel." You can name the rule anything you wish, and as mentioned above you can complete the program's full path by dragging it to the Terminal window.
spctl ——add ——label "MyLabel" /Path/To/program
Think of the label as a group to which you are adding the application, so you can repeat the above command and specify a different program to assign it to the same rule label (or use a different label if you choose). Note that this step will require you to either run the command as administrator or provide your administrator password in the authentication dialog that pops up.
Similarly, using the same label used in the previous example, we can remove even an entire "group" of programs from Gatekeeper by issuing a command similar to the following:
spctl ——remove ——label "MyLabel"
To see a list of all the rules on the system, simply run the following command in the Terminal.
spctl ——list
In the output for this list, you will see your custom labels among built-in rules like the "Developer ID" and "Mac App Store" labels.
To list apps from unknown sources you’ve approved for use we can use, in Terminal:
sudo spctl ——list | grep UNLABELED
Enter your administrator password, if asked, then press Enter or return again.
Remove an Application Exception
Removing an application from the Gatekeeper approval list is just as easy, simply switch out the –add flag with –remove, the syntax is otherwise the same:
spctl ——remove /Path/To/Application.app
Enabling and disabling Gatekeeper
While the easiest way to disable Gatekeeper is through the System Preferences, you can also do so from the OS X Terminal with the following command:
spctl ——master-disable
In addition to enabling or disabling, you can check whether Gatekeeper is running using the status option with this command:
spctl ——status
You can also reverse this and go back to the default strict Gatekeeper settings of only allowing apps from the Mac App Store and identified developers by issuing the following command string:
sudo spctl ——master-enable
Hitting return and re-authenticating will return macOS Gatekeeper back to its strict default state of disallowing random apps from launching.
If Gatekeeper is enabled the status will respond with assessments enabled, for successful disabling of Gatekeeper the response will be assessments disabled.
Determine if an application is allowed
With Gatekeeper enabled, you can have the system check a specific application package to see whether it has privileges to run. To do so, simply type "spctl -a" in the Terminal followed by a single space, and then drag the application of choice to the Terminal window to complete the full path to the program package so it looks like the following:
spctl -a /Path/To/program.app
The program can be an application bundle, a shell script, or any other executable file. When you execute this command on the targeted file, Gatekeeper will assess the file's eligibility to run and output the results to you.
Manage Gatekeeper remotely
If you need to remotely enable or disable Gatekeeper, this can be performed by using spctl via the SSH protocol, or by using the Terminal or even through Apple Remote Desktop (available on the Mac App Store or the Online Apple Store).
These commands should be executed as the root System Administrator user since administrator authentication is required to configure Gatekeeper.
If we imagine that the computer we need to remotely enable Gatekeeper on is called remote01 and the user admin account is admin, if this computer is on the same network as your own computer, you can use the following to SSH remote login to the computer and manage Gatekeeper:
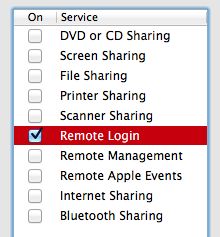
Enable Remote Login on the remote01 computer within Sharing preferences:
On your computer, open the Terminal utility and enter:
ssh [email protected]
This command assumes that the user account is admin, that the computer’s domain name is remote01.example.com.
When asked if you are sure you want to continue connecting to this remote host, enter yes, then press the Enter key.
Now enter the password for the admin user that you wish to remotely authenticate as and press the Enter key.
The Terminal prompt should now have you logged in as the admin user on the remote remote01 computer.
To remotely enable Gatekeeper, enter the following, then press by the enter key:
sudo spctl ——master-enable
The below displays the result of this command in the Security and Privacy preferences pane:
To remotely disable Gatekeeper, enter the following, then press the Enter key:
sudo spctl ——master-disable
Below displays the result of this command in the Security and Privacy preferences pane:
Authenticate, if required, with the admin user’s password and press the enter key. To verify your changes, as already done if checking this directly on the system and not remotely, enter the following, followed by the enter key :
spctl ——status
File Quarantine
The Gatekeeper feature uses the File Quarantine system to identify known malware. File Quarantine is essentially a blacklist of malware signatures that Gatekeeper uses to identify a downloaded file that includes any known malware.
Apple updates the File Quarantine system on a regular basis, and downloads the updates to Mac along with other system and security updates.
Even if it very recommended to NOT HALT the File Quarantine updates, here there are the methods to halt these if your Internet data rate (speed) is not so high. While there doesn’t seem to be a reason today to prevent the updates, it can still be done with these steps:
OS X Mountain Lion and earlier:
- Open System Preferences and select the Security & Privacy preference pane.
- Click the lock and enter an administrator name and password.
- Click the Advanced button.
- In the sheet that drops down, place or remove the checkmark in the “Automatically update safe download list” item.
OS X Mavericks through macOS High Sierra:
- Open System Preferences and select the App Store icon.
- Place or remove the checkmark from the “Install system data files and security updates” item.
OS X Mojave and later:
- Open System Preferences and select the Software Update preference pane.
- Click the Advanced button. In the sheet that drops down, place or remove the checkmark in the “Install system data files and security updates” box.
 |